Register for our next webinar !

To prepare and conduct your meetings, WEDO guides you in 5 steps:
- Before the meeting – Steps 1 and 2 : preparation of the agenda as a team. The writer or facilitator adds the meeting, establishes the list of items to be discussed and then invites participants to complete the agenda.
- During the meeting - Step 3 : the writer writes the minutes in real time. All participants can attend live note-taking.
- Post-meeting - Steps 4 and 5 : the writer and participants review, edit and validate the meeting minutes.
Through this article, discover some tips to conduct your meetings with WEDO taking into account the 5 proposed steps. You will see that at each step, it is possible to keep the participants informed and make them aware of their role in the preparation and follow-up of the meeting. To give substance to our explanations, we propose a concrete case study:
The preparation and follow-up of an Executive Committee by Agathe Rost1, Executive Assistant
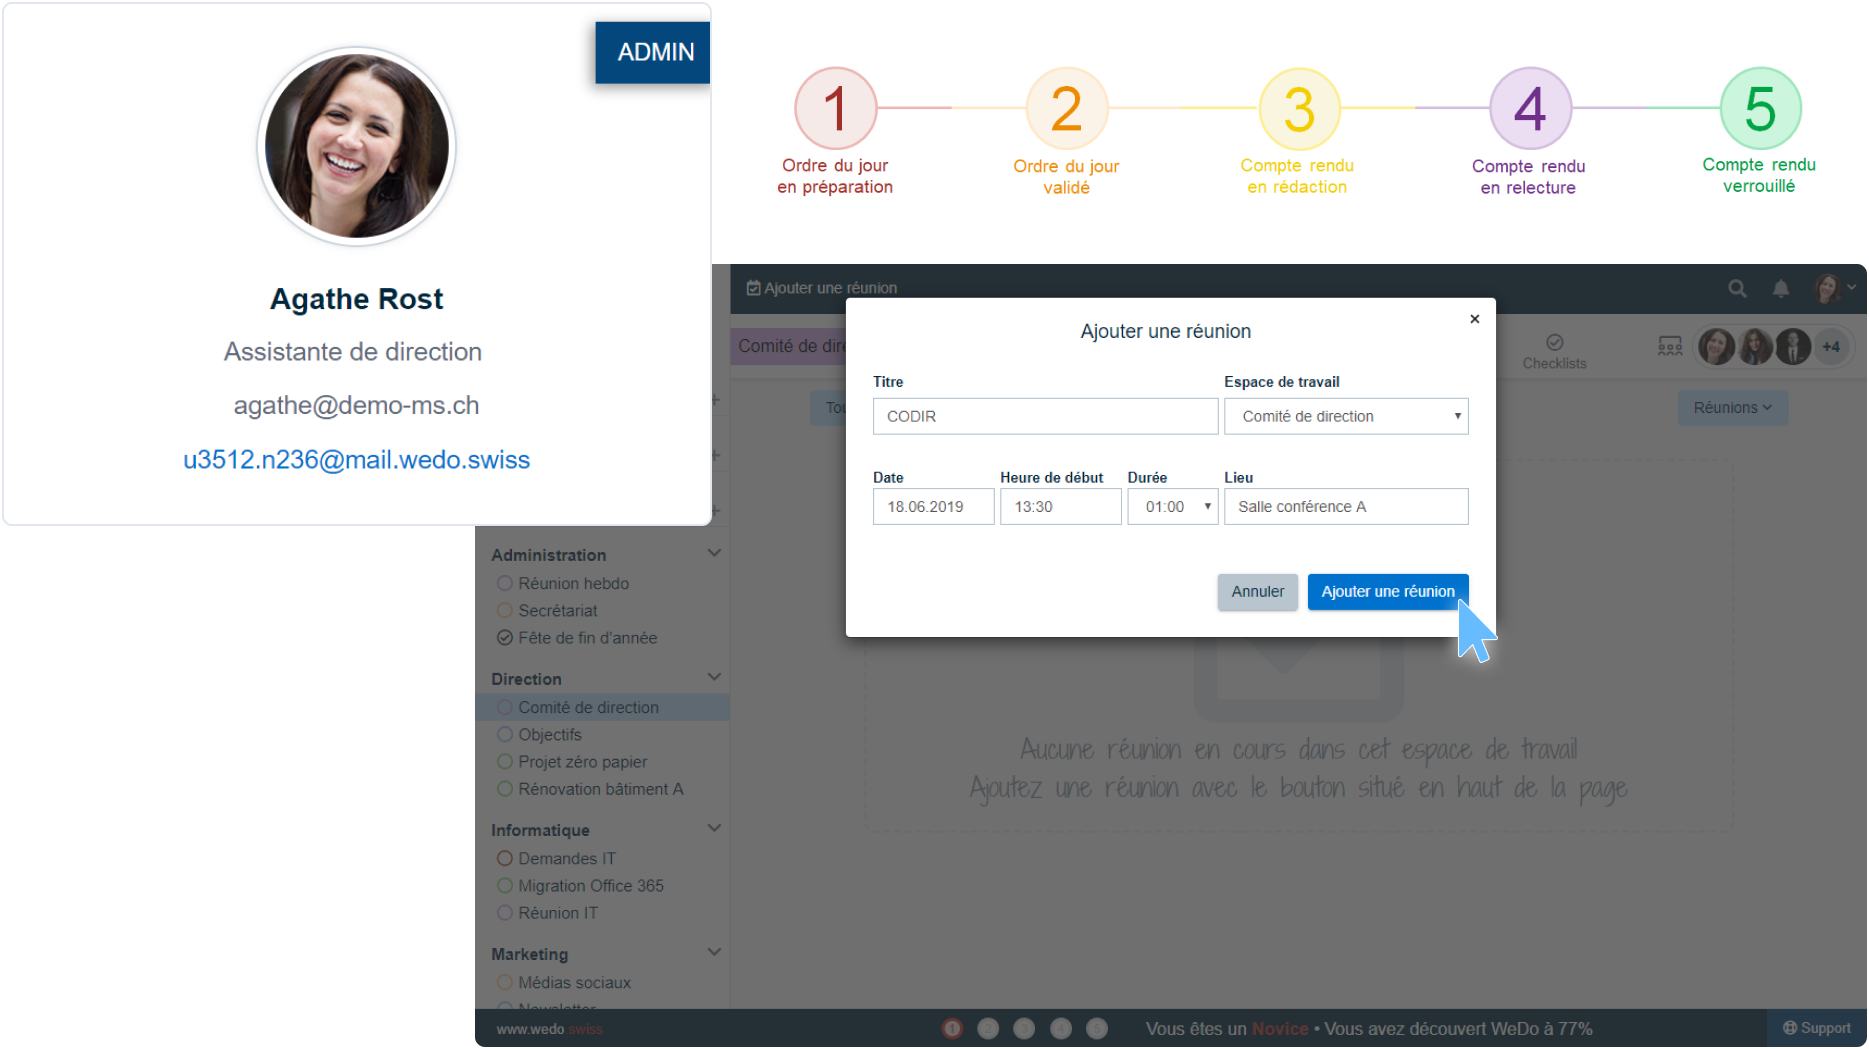
Step 1: Meeting agenda in preparation
Agathe Rost, Executive Assistant, decided to prepare the agenda for the next committee meeting in a week's time. The director of the organization, Bernard Macherel*, sent her by email the list of topics to be discussed. Agathe goes to the workspace dedicated to the Executive Committee and adds a meeting. After entering the title, date, time, duration and location of the meeting, she focuses on the list of participants. The members of the Executive Committee workspace have been added automatically to save her precious time.
Agathe now wishes to manage the different access rights of the participants. For this meeting, Mathilde and Bernard have all the same rights as Agathe. The other participants will only be able to modify the agenda items in steps 1 and 3.

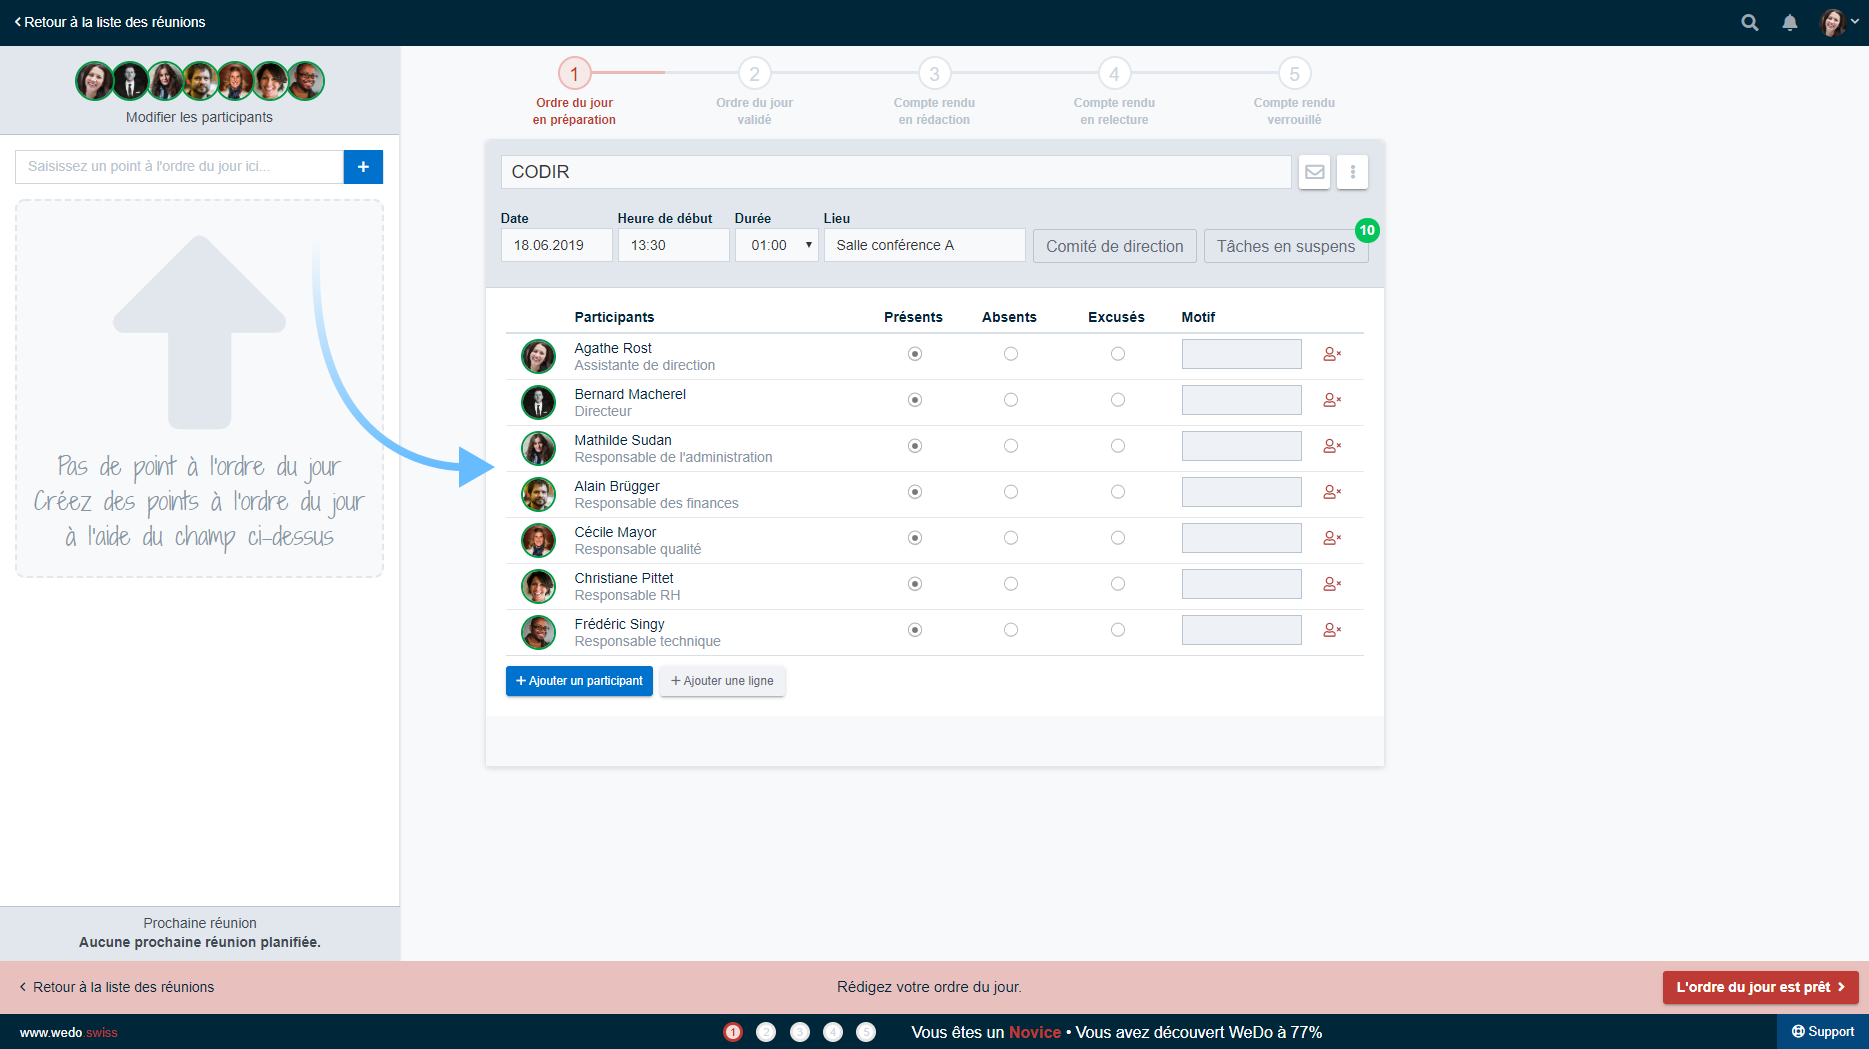
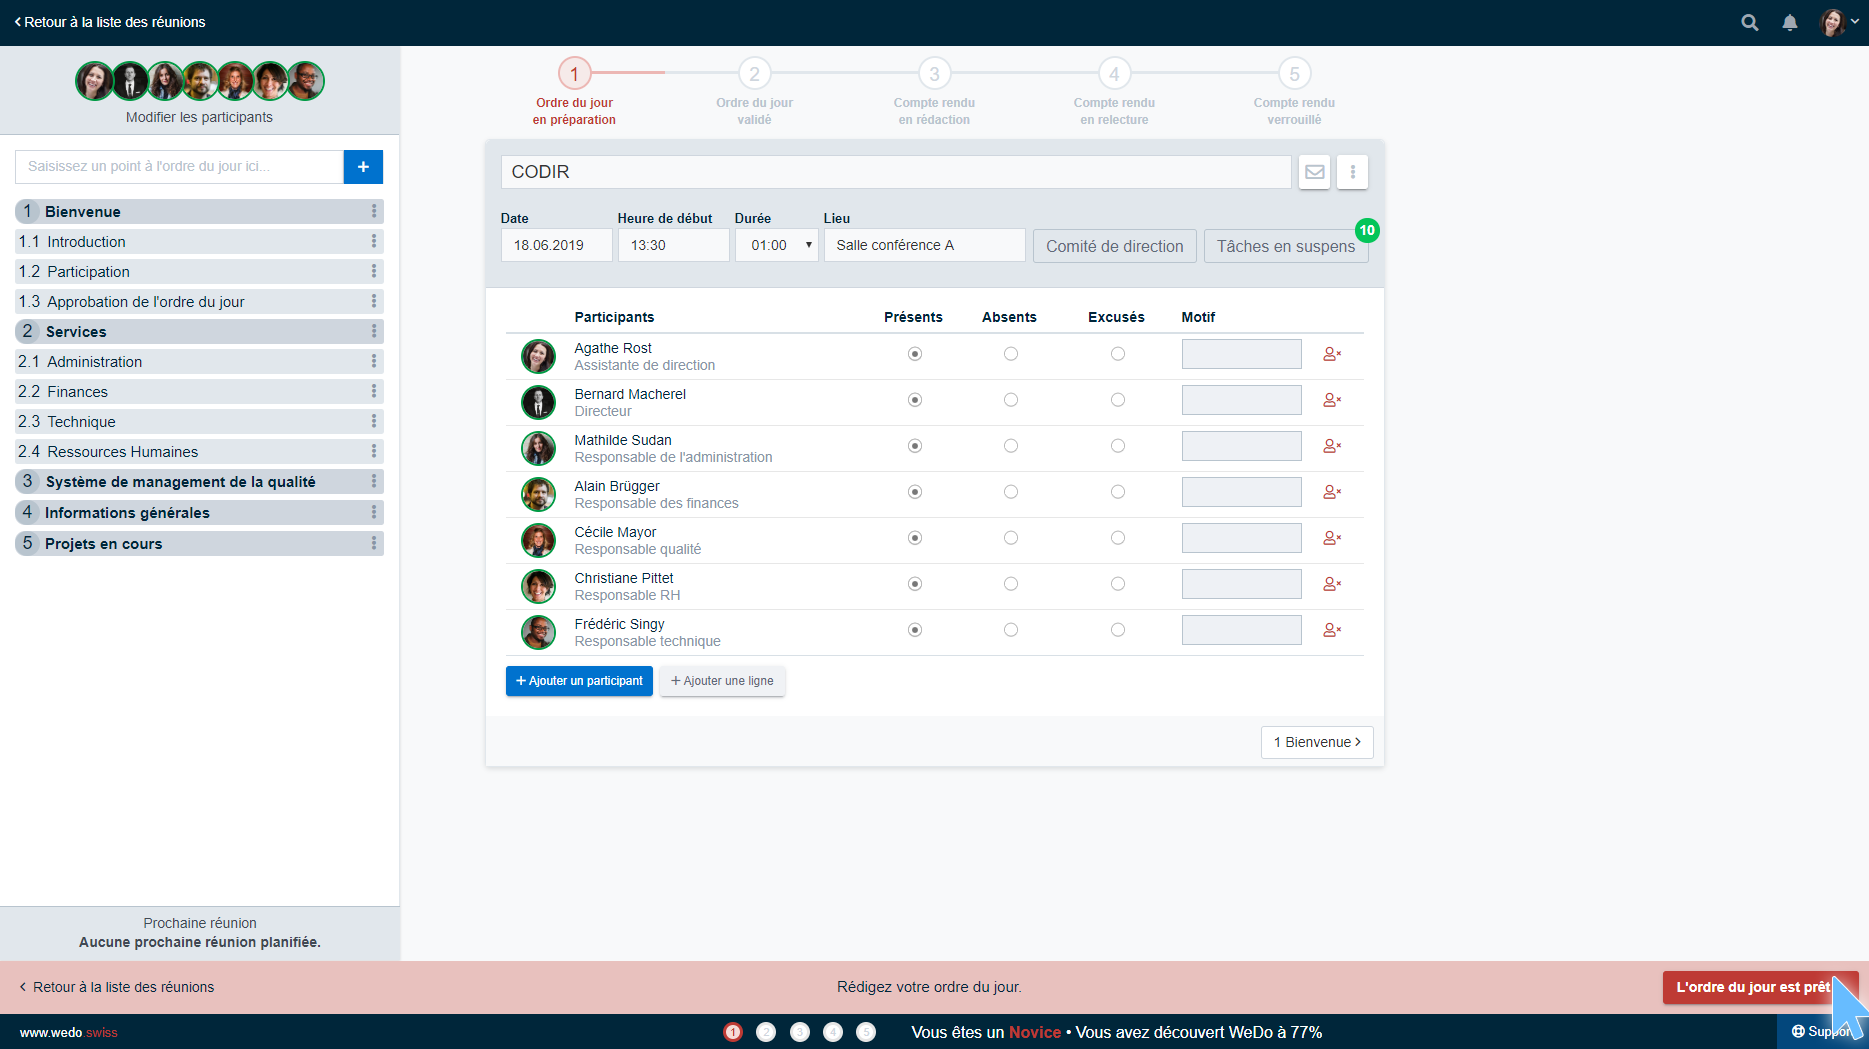
Next, Agathe wishes to add the items to the agenda. With a few clicks, she copies the list of topics previously listed by her director and pastes it into the input bar. The items are created automatically and now appear in the table of contents on the left side of the screen. Agathe can now schedule them as she pleases.

The outline of the meeting is ready. Agathe would like to inform participants to add their notes to the agenda items. To do so, she sends an email to participants directly from the platform by clicking on the button with the envelope.
The participants are listed as recipients. Agathe takes advantage of the predefined subject and message to save time and clicks directly on Send by email.

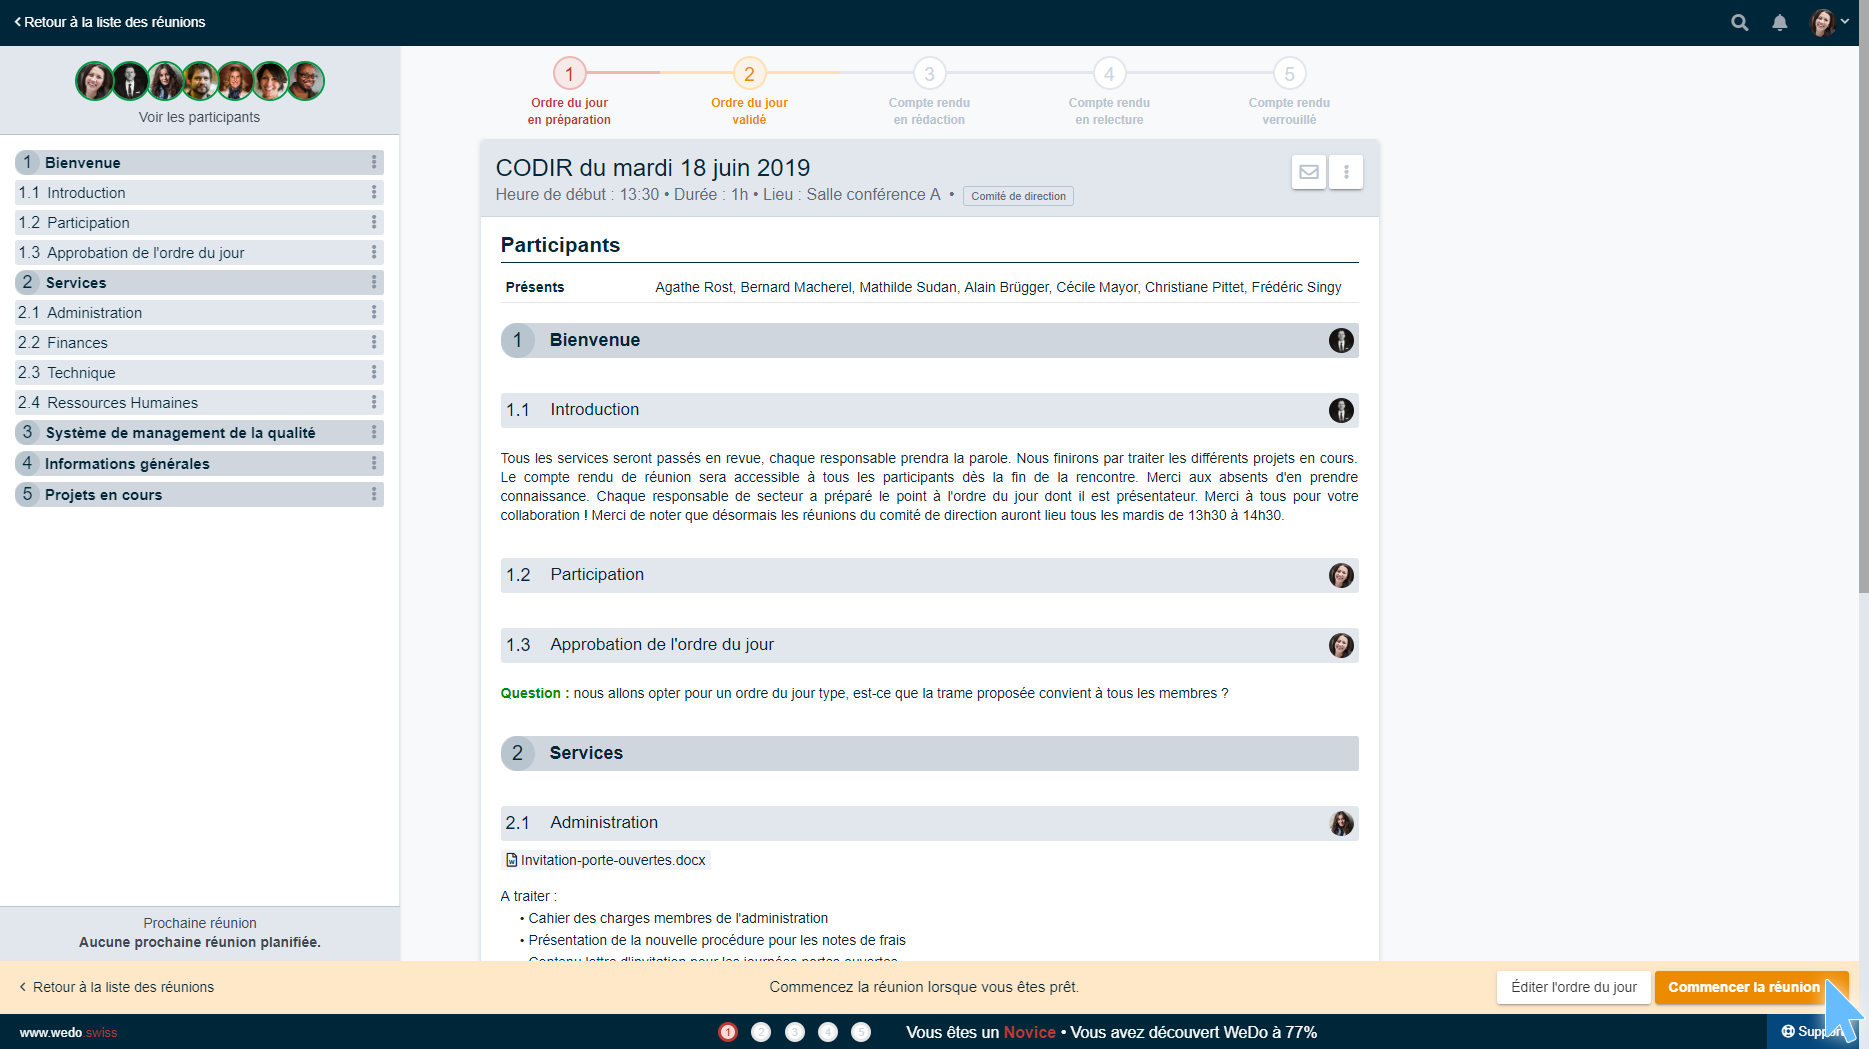
Step 2: Meeting agenda validated
On the eve of the meeting, the agenda has been completed by all participants and is normally no longer subject to change. After a brief rereading, Agathe can validate the agenda and proceed to step 2 by clicking on Meeting agenda is ready in the red banner at the bottom of the screen.
Agathe finally has to add a last minute information in one of the agenda items. From the orange banner at the bottom of the screen, she edits the meeting agenda.

Step 3: Meeting minutes currently written
On D-Day, Agathe returns to the previously prepared meeting. The meeting is in step 2 - Meeting agenda validated. At the bottom left of the screen, she clicks on Start Meeting.
Agathe begins by completing the information about the participants. She checks off the absent and excused persons. She also adds the reason for the apology in the field provided.

The meeting begins: Agathe is ready to write up the minutes of the discussions. As she writes it, she navigates easily from point to point using the table of contents and adds notes, decisions and tasks to the various points discussed. At the end of the meeting, Agathe clicks on the End Meeting button in the yellow banner at the bottom of the screen.

Step 4: Meeting minutes in review
A few hours after the meeting, Agathe would like to review the minutes. She returns to the Executive Committee workspace, resumes the meeting in Step 4 - Meeting minutes in review. To make corrections, she clicks Edit Minutes in the purple banner at the bottom of the screen. Once the changes have been made, she clicks Finish.
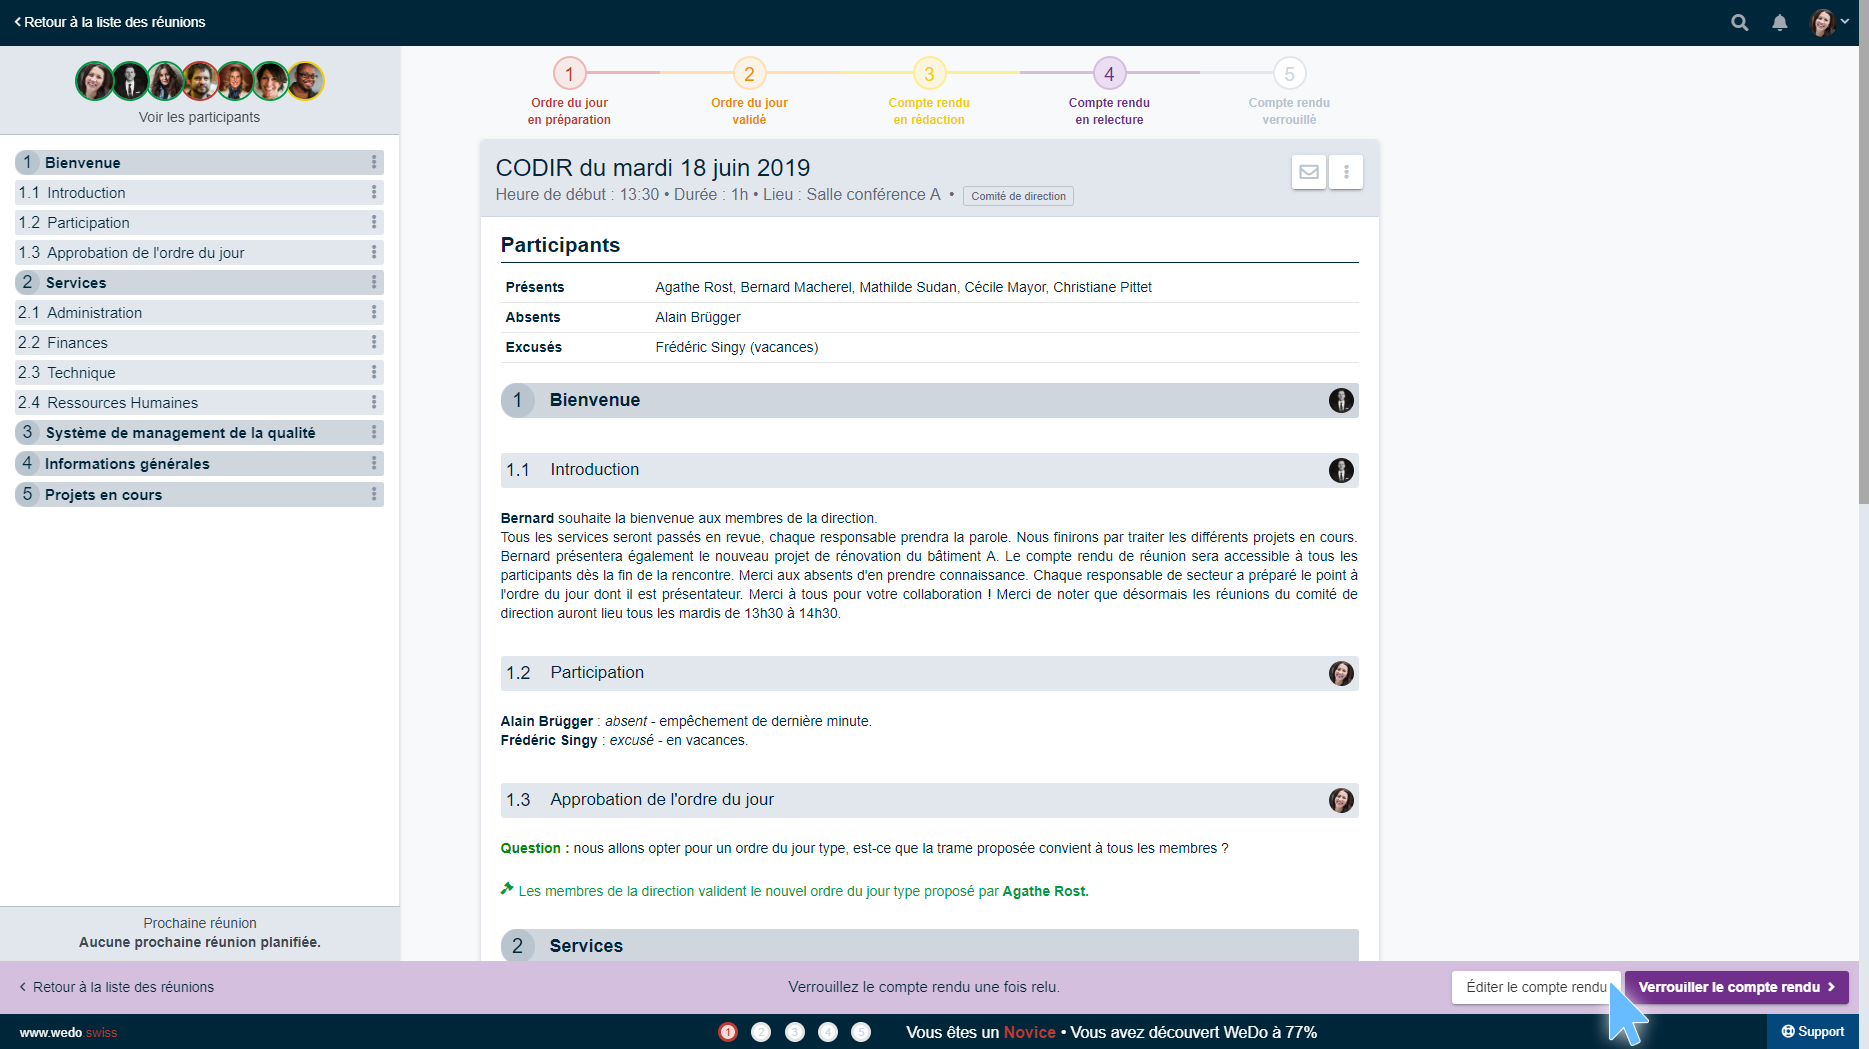
Step 5: Meeting minutes locked
A few days after the meeting and after a final reading, Agathe can finally move on to the last step. In order to follow up from one meeting to the next, she decides to lock the minutes. The minutes can no longer be modified.
To do this, she clicks the Lock meeting minutes button in the purple banner at the bottom of the screen and follows the procedure required for locking.

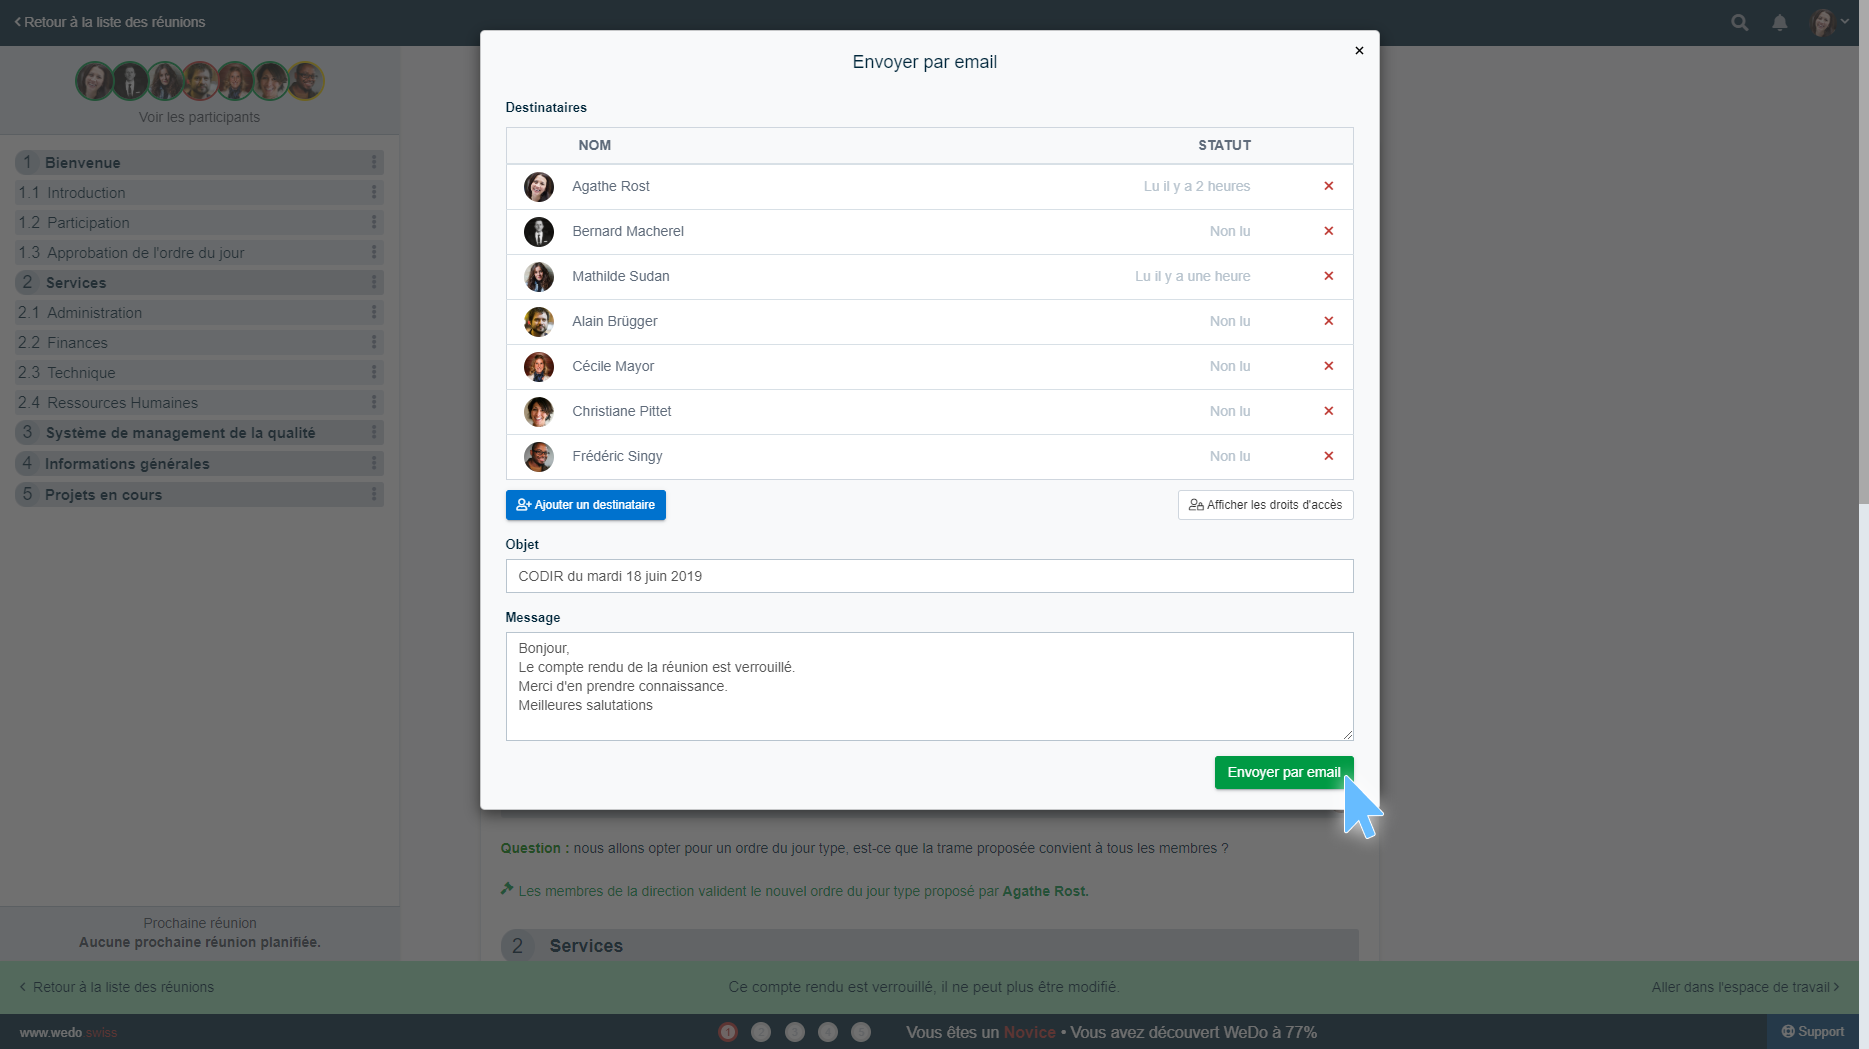
Finally, Agathe sends an email to participants to inform them that the minutes have been locked. They are invited to read it again in order to ensure a follow-up from one meeting to the next.
The 5 proposed steps frame the overall conduct of a meeting and allow users to situate themselves in the process. At each step, you have the possibility to inform the participants so that they can get involved in the preparation of the agenda and in the review of the minutes. WEDO allows you to improve the management of your meetings while reinforcing the collaborative aspect.
Would you like to facilitate the preparation and conduct of your meetings?
Footnotes
-
Fictional characters. ↩
Related posts
Get the latest tips sent straight to your inbox: Subscribe to our newsletter
Mathilde Sudan